视图显示
参考
- 模式:
Object, Pose, and Edit Mode
- 面板:
Viewport Display panel in Object/Pose mode.
Viewport Display panel in Edit mode.
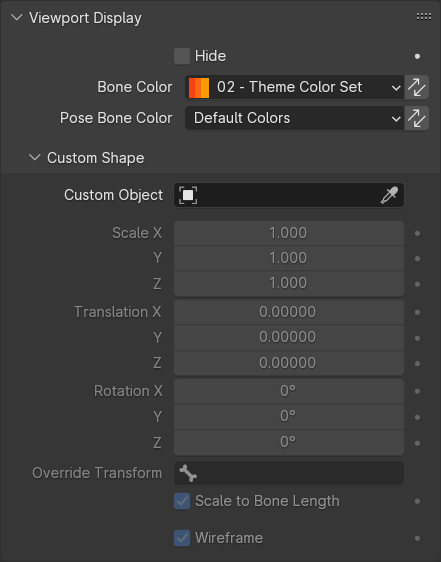
Display panel lets you customize the look of your bones.
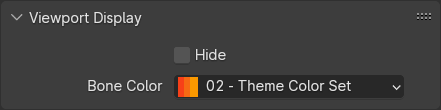
- 隐藏
Hides the bone in the 3D Viewport. When this is unchecked, the bone's visibility is determined by the visibility of its bone collections.
- 骨骼配色
Either a selection of the theme-dependent colors, or a custom color. This is the primary way to color a bone.
This color is stored on the bone itself, and thus is visible in both Pose and Edit modes. If there are multiple armature Objects that share the same Armature data-block, all armatures will share this color.
- 复制骨骼配色到选中项
Copy the bone color of the :term`Active` bone to all selected bones.
- 姿态骨骼配色(仅于姿态模式下)
Either a selection of the theme-dependent colors, or a custom color. This is a way to override the bone color on a per-armature object basis.
When this is set to 'Default', the regular Bone Color is shown (see above).
This color is stored on the Pose Bone, and thus is specific to this particular armature object. It is only available in Pose mode. If there are multiple armature Objects that share the same Armature data-block, they each can have unique pose bone colors.
- 复制骨骼配色到选中项
Copy the bone color of the :term`Active` bone to all selected bones.
骨骼颜色
Bones can be individually colored. For these colors to be visible, enable the Bone Colors checkbox in the Armature display panel.
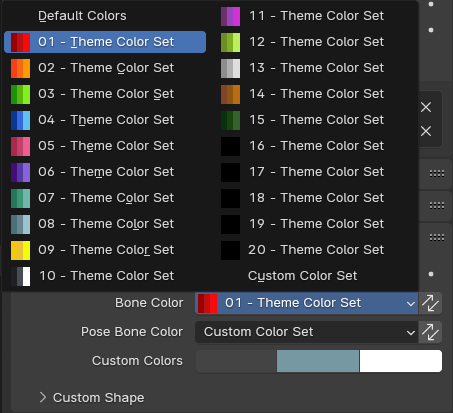
Viewport Display panel in Pose mode, showing the choices in color palettes as well as options for custom colors.
The primary source of bone colors is the Theme, which defines 20 bone color palettes. Each entry consists of three colors:
- 常规
The color of unselected bones.
- 选择
第二个颜色按钮是所选骨骼的轮廓颜色。
- 活动
第三个颜色按钮是激活骨骼的轮廓颜色。
一旦你改变了一种颜色,它就被切换到 自定义配色集(Custom Set) 选项。
自定义形状
Blender允许您使用另一个对象作为 "模板" ,将骨架的每个骨骼赋予特定形状( 物体模式 和 姿态模式 )。为了可见, 必须启用 形状 复选框( )。
- 自定义物体
定义所选骨骼的自定义形状的物体。
- 缩放 X, Y, Z
要应用于自定义形状的其他缩放系数。
- X/Y/Z/-X/-Y/-Z
应用于自定义形状的附加旋转系数。
- 旋转 X, Y, Z
应用于自定义形状的附加旋转系数。
- 覆盖变换
定义自定义形状的显示变换的骨骼。
- 缩放到骨骼长度
选择不使用骨骼长度时,使编辑模式中的更改不会改变自定义形状的大小。
- 线框
启用时,无论视口绘图模式如何,骨骼都以线框模式显示。适用于不影响观察的定制骨骼链。
工作流程
要指定自定义形状给骨骼,你必须:
切换到 姿态模式 Ctrl-Tab 。
单击选择相关骨骼。
转到 视图显示 面板 自定义形状 字段,并选择先前在场景中创建的3D物体; 在这个例子中,我们使用的是立方体和锥体。您可以选择将 属性(At) 字段设置为另一个骨骼。
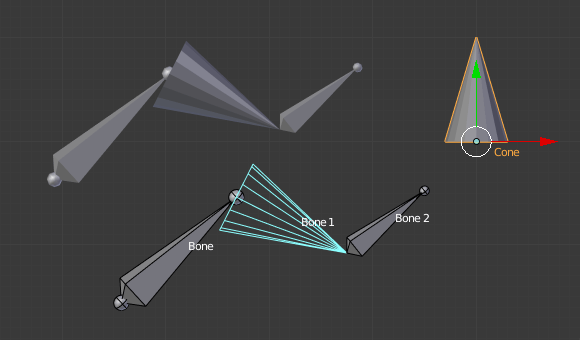
用形状指定给骨架的骨骼。注意锥体的中心。
Note
这些形状永远不会被渲染,就像任何骨骼一样,它们仅在 3D 视口中可见。
虽然任何类型的对象似乎都被 物体 (网格,曲线,甚至metas ...)所接受,但只有网格才是有效的。所有其他类型只是让骨骼看不见; 没有在视图显示...
形状物体的原心将位于 骨骼根部 (请参见 骨骼页面 的根部/尾端)。
形状的物体属性将被忽略(即,如果通过在 物体模式 中修改其尺寸使立方体成为平行六面体,则仍然是一个立方体形状的骨骼...)。
"沿骨骼" 的轴是Y轴,并且形状对象总是按比例缩放,以便一个单元沿整个骨骼长度伸展。
如果你需要删除骨骼的自定义形状,只需右键单击 自定义形状 字段,然后在弹出菜单中选择 恢复到默认值 。
所以总结一下,你应该使用网格作为形状物体,其中心在它们的较低的Y端,整体Y长度为1.0个blend单位。